

Views: 0 Author: Site Editor Publish Time: 2026-09-26 Origin: Site


Pinpointing the exact dimensions for an outdoor cooking space requires balancing culinary ambition with the physical constraints of your patio or deck. Homeowners frequently miscalculate the required footprint for outdoor kitchens, leading to cramped traffic flows, insufficient prep space, or oversized units that dominate the landscape. Traditional masonry builds exacerbate this by consuming excessive square footage for structural support. This guide provides a technical evaluation framework for sizing a modular outdoor kitchen, detailing how to match prefab pod dimensions (from compact 2m units to expansive 4m setups) to your backyard, and why aluminum framing offers the highest space-to-utility ratio.
Clearance is Non-Negotiable: A functional layout requires a minimum of 36 to 42 inches of horizontal clearance around the pod for safe operation and traffic flow.
Aluminum Maximizes Usable Space: An aluminum outdoor kitchen design utilizes thin, high-tensile framing, offering up to 20% more internal storage capacity compared to thick masonry walls of the same exterior footprint.
Size Dictates Appliance Capacity: Compact pods (2m) limit you to a grill and basic storage, while standard (3m) and large (4m+) pods unlock multi-zone cooking, refrigeration, and dedicated prep areas.
Appliance Cutouts Vary by Brand: Never assume "standard" dimensions; always verify exact manufacturer specifications before purchasing third-party grills or refrigerators to fit your pod.
Utility Routing Drives Placement: Gas, water, and electrical connections must be mapped prior to selecting a pod size, as fixed utility lines often dictate the final installation footprint.
Selecting the right pod size starts with a rigorous assessment of your existing hardscape. You must define the exact usable footprint of your patio or deck before looking at appliance specifications. We see many projects stall because the initial measurements ignored roof overhangs or property setbacks.
Follow these steps to define your usable footprint:
Measure the total dimensions of the paved or decked area using a 100-foot fiberglass tape measure.
Subtract space required for existing structures, retaining walls, and stair landings.
Locate your property lines and check municipal setback requirements. Many local codes prohibit installing permanent cooking structures within three to five feet of a boundary.
Mark the potential installation area using high-visibility painter’s tape. This physical outline helps you visualize how the pod interacts with the surrounding environment.
A functional and safe outdoor cooking environment relies heavily on the 36-to-42-inch clearance rule. You must maintain a minimum of 36 inches of horizontal clearance around the exposed sides of the pod. This space allows guests to walk past the cooking zone safely without crowding the chef. For the primary working side, expand this clearance to 42 inches. This ergonomic spacing ensures you can fully open cabinet doors, access pull-out trash bins, and open front-loading refrigerators without stepping backward awkwardly. If your setup includes bar seating on the reverse side, allocate at least 48 inches of clearance behind the stools to accommodate chair push-back and pedestrian traffic.
Vertical clearance demands equal attention, especially if you plan to integrate the pod beneath a shelter. Calculate the necessary height to fit the pod safely under a pergola, gazebo, or covered lanai. Combustible overhead structures require strict vertical clearances from the top of the grill grate. Most manufacturers mandate a minimum of 36 to 48 inches of vertical space between the grill and any unprotected combustible ceiling. If your shelter sits lower, you must install an overhead ventilation hood. Size the hood to be at least six inches wider than the grill surface to capture smoke and grease effectively. Factor the hood’s dimensions and exhaust duct routing into your overall spatial planning.
Zoning the yard prevents your new cooking station from cannibalizing your entertainment space. Divide your backyard into distinct functional zones: cooking, dining, and lounging. The cooking zone should sit close to the indoor kitchen to facilitate the transfer of food and supplies. However, it must remain distinct from the dining areas. Ensure the pod does not encroach on the space needed for large dining tables or deep seating sets. A well-sized pod acts as an anchor for the cooking zone without bleeding into relaxation areas.
Map the wind and smoke trajectories of your property. Observe the prevailing wind direction during the times you are most likely to cook. Orient the pod so the wind blows across the grill rather than directly into the front or back. This orientation prevents the wind from extinguishing low gas flames and stops smoke from blowing directly into the chef’s face. Position the pod downwind from your outdoor dining area and open house windows. Proper placement ensures smoke and cooking odors dissipate harmlessly into the open yard.
Before selecting a specific model, you must navigate manufacturer naming conventions. The outdoor kitchen industry lacks standardized sizing labels. One brand’s "standard" 3-meter unit might be marketed as "compact" by a competitor. Another brand might label a 2.5-meter unit as "large." Never rely on marketing terms to determine fit. Always request the exact meter or foot measurements of the chassis. Verify the total length, depth, and height of the assembled unit. Use these hard numbers to dictate your purchasing decisions and layout planning.
Compact pods offer a streamlined footprint ideal for urban patios, small wooden decks, and secondary cooking stations near a pool house. These units maximize utility within a highly restricted space. A 2-meter pod typically accommodates a standard 32-inch gas grill, a single access door for the gas tank, and a narrow bank of storage drawers. Countertop prep space remains minimal. You will have just enough room to rest a cutting board or a platter of raw meat next to the grill.
The primary trade-off with a compact pod is the lack of appliance diversity. You simply do not have the linear footage to install built-in refrigeration, a sink, or a side burner. Homeowners choosing this size must rely on indoor refrigerators or portable coolers. You will also need supplementary prep tables or a rolling cart to manage complex meals. Despite these limitations, a compact pod delivers a massive upgrade over a standalone cart grill, providing a built-in aesthetic and durable storage for essential tools.
Mid-size pods represent the industry standard for a complete outdoor cooking triangle. Measuring approximately 3 meters in length, these units fit comfortably in medium-sized suburban backyards. This footprint strikes the perfect balance between appliance capacity and hardscape conservation. A 3-meter pod supports a large 36-to-42-inch grill, providing ample surface area for multi-zone cooking. It also introduces enough space for an under-counter outdoor refrigerator, a pull-out trash drawer, and a dedicated bank of deep storage drawers.
This size offers adequate prep counters on both sides of the grill. You can establish a clear workflow: raw prep on the left, cooking in the center, and resting or serving on the right. The main trade-off involves utility planning. Fitting plumbing for a sink, gas lines for the grill, and electrical outlets for the fridge within a 3-meter chassis requires precise routing. You must plan these connections carefully to avoid crowding the internal storage cavities.
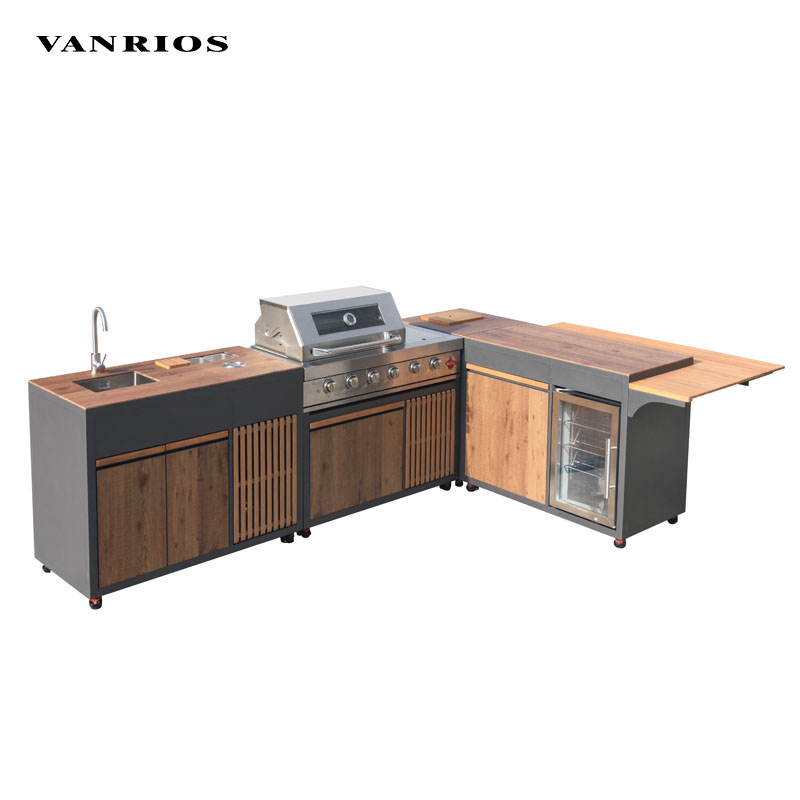
Large and L-shape pods cater to expansive hardscapes and frequent large-scale entertaining. Measuring 4 meters or more, these configurations serve as the foundation for a true villa outdoor kitchen. This expansive footprint enables dual cooking zones. You can install a large gas grill alongside a kamado smoker or a dedicated flat-top griddle. The extended length easily accommodates a full-size outdoor sink, multiple refrigeration units, and extensive cabinetry.
L-shape configurations naturally create a physical barrier that defines the cooking zone while offering a perfect overhang for bar seating. The trade-offs for these massive pods include the highest footprint demand and complex utility requirements. The aggregate weight of multiple heavy appliances, dense countertops, and the framing itself may require reinforced concrete pads. Standard patio pavers may settle unevenly under the concentrated load of a fully loaded 4-meter L-shape pod.
Pod Category | Approximate Length | Best Suited For | Typical Appliance Capacity | Primary Trade-Off |
|---|---|---|---|---|
Compact | 2 Meters (6.5 Feet) | Urban patios, small decks, tight spaces | 32" Grill, basic access doors, narrow drawers | No space for built-in fridge or sink; limited prep area |
Mid-Size | 3 Meters (10 Feet) | Suburban backyards, standard patios | 36"-42" Grill, under-counter fridge, trash pull-out, adequate prep space | Utility routing must be tightly managed to preserve storage |
Large / L-Shape | 4+ Meters (13+ Feet) | Expansive hardscapes, luxury setups, frequent hosting | Dual cooking zones, sink, multiple fridges, bar seating | High footprint demand; may require reinforced foundation pad |
When evaluating materials for your outdoor cooking space, the structural footprint versus internal volume ratio dictates overall efficiency. Traditional masonry requires thick cinderblock walls, mortar, and exterior stone veneer. A standard masonry wall consumes up to six inches of depth on every side. In contrast, an aluminum outdoor kitchen design utilizes thin, precision-engineered framing. The aluminum chassis walls are often less than two inches thick. This dramatic reduction in structural bulk maximizes the internal cavity. You gain up to 20% more usable space for deep drawers, slide-out trash cans, and concealed gas tank storage compared to a cinderblock build of the exact same exterior dimensions.
The weight-to-strength ratio of aluminum fundamentally changes where you can install your cooking station. Masonry builds are incredibly heavy, often exceeding 150 pounds per linear foot before appliances are added. This immense weight requires poured concrete footings. A prefab backyard kitchen pod constructed from marine-grade aluminum weighs a fraction of that amount. Aluminum’s lightweight nature makes it the only viable option for elevated wooden decks, rooftop terraces, or older paver patios that lack structural reinforcement. You achieve the built-in aesthetic and high load-bearing capacity for heavy granite countertops without the risk of structural failure or the expense of pouring new foundations.
Corrosion resistance ensures the longevity of your investment in exposed environments. Powder-coated aluminum provides unparalleled resistance to rust, warping, and rot. Unlike steel studs that can rust when exposed to salty coastal air, or wooden frames that warp and invite termites, a high-quality Aluminum Outdoor Kitchen maintains its structural integrity indefinitely. The powder-coating process bakes a protective layer onto the metal, sealing it against moisture and UV degradation. This inherent durability means the pod does not require bulky protective enclosures or constant maintenance, further preserving your usable patio space.
True modularity offers future-proofing for your outdoor space. Precision-engineered aluminum chassis systems are designed to bolt together seamlessly. This modular approach allows your kitchen to evolve as your patio size or culinary needs grow. You can start with a compact 2-meter pod today. Next year, you can purchase an additional 1-meter module containing a sink and a refrigerator, bolting it directly to the existing frame. This seamless expansion is impossible with permanent masonry builds. Aluminum modularity ensures your initial investment remains relevant and adaptable over time.
A major risk in assembling an outdoor kitchen involves the "standard" cutout myth. Many homeowners assume that all 32-inch grills require the exact same cutout dimensions. This assumption leads to costly installation errors. Cutout requirements vary wildly across different brands. A 32-inch grill from one manufacturer might require a cutout width of 30.5 inches, while another requires 31.25 inches. Never order a prefab pod based on generic appliance sizes. Always secure the exact manufacturer specification sheets for your chosen grill, side burner, and refrigerator. Verify that the modular pod’s pre-cut dimensions perfectly align with these specific appliance specs before finalizing your purchase.
Designing a functional layout requires a strict decision framework for balancing prep real estate against cooking firepower. In sub-3-meter pods, space is a premium commodity. You must prioritize continuous countertop space over adding secondary cooking appliances. A side burner might seem appealing for boiling corn or reducing sauces, but it consumes at least 15 inches of valuable counter space. If you only use the side burner twice a year, you are permanently sacrificing daily prep space. For compact and mid-size pods, maximize your continuous flat surfaces. Use the main grill for all cooking tasks to preserve your workflow area.
Storage configuration directly impacts the daily usability of the pod. Evaluate the utility of deep drawers versus standard access doors based on the pod’s depth and your specific habits. Standard access doors are cheaper but create dark, deep cavities where items get lost in the back. Drawers bring the contents out to you. Prioritize deep, heavy-duty drawers for storing bulky items like cast iron pans, pizza stones, and bags of wood chunks. Use narrow top drawers for grilling tools, thermometers, and skewers. If your pod houses a propane tank, ensure the designated access door includes a pull-out sliding tray. This feature eliminates the need to awkwardly reach inside the cabinet to lift a heavy steel cylinder.
Failing to pre-plan utility connections is the most common operational risk in outdoor kitchen installations. Do not order a pod before verifying the feasibility of running utilities to your specific backyard location. Hard-piped natural gas requires trenching from the house meter to the pod location. You must determine if tree roots, retaining walls, or existing concrete paths block this route. Electrical connections require a dedicated 120V, 20-amp GFCI circuit to power refrigerators, rotisserie motors, and LED lighting. If you plan to include a sink, you must map both the fresh water supply line and the drainage route. Fixed utility lines often dictate the final installation footprint, so secure contractor estimates for utility runs before finalizing the pod size.
Foundation and surface leveling present significant challenges on existing hardscapes. Patios are intentionally built with a slight slope—typically 1/4 inch per foot—to direct rainwater away from the house foundation. If you place a rigid frame on a sloped patio, your countertops will slant, liquids will pool on one side of the grill, and cabinet doors will hang unevenly. Mitigation requires adjustable leveling legs. Ensure your modular aluminum frame includes heavy-duty, threaded leveling feet. These legs allow you to micro-adjust the height of each corner independently. You can achieve a perfectly level cooking surface and plumb cabinetry while maintaining the necessary drainage slope of the patio beneath the unit.
Permitting and fire codes dictate the legal placement and maximum allowable size of your pod. Municipal requirements strictly govern the distance a combustible cooking appliance must be placed from combustible structures. This includes vinyl siding, wooden fences, deck railings, and overhead pergolas. Many codes require a minimum clearance of 36 to 48 inches from any combustible material. If your patio is small and surrounded by wooden fencing, these setback rules severely restrict the maximum allowable pod size. Always consult your local building department or a licensed contractor to review fire codes before purchasing a unit. Ensure your planned layout complies with all safety regulations to avoid fines or forced removal of the structure.
Tape out the exact dimensions of the proposed pod on your patio using high-visibility painter's tape to verify physical clearances and traffic flow.
Schedule an on-site consultation with a licensed utility contractor to map out gas, water, and electrical trenching routes before ordering any equipment.
Request the technical specification sheets for your chosen aluminum modular system to confirm appliance cutout compatibility with your specific grill and refrigerator models.
Measure the slope of your existing hardscape using a 4-foot level to ensure the pod's adjustable legs can accommodate the grade without compromising stability.
A: You need a minimum of 36 inches of horizontal clearance around the sides and back for safe pedestrian traffic. On the primary working side where the chef stands, allow at least 42 inches to comfortably open cabinet doors, access pull-out trash bins, and operate front-loading refrigerators without blocking the pathway.
A: Yes, provided you choose a lightweight aluminum frame. Aluminum pods weigh significantly less than traditional masonry builds, making them safe for elevated wooden decks. You must still verify the deck's load-bearing capacity to ensure it can support the combined weight of the frame, heavy appliances, and stone countertops.
A: Most manufacturers and fire codes require 36 to 48 inches of vertical clearance between the top of the grill grate and any unprotected combustible ceiling. If your shelter is lower than this requirement, you must install an overhead ventilation hood to safely capture and exhaust heat, smoke, and grease.
A: Yes. High-quality marine-grade aluminum naturally resists corrosion. When finished with a baked-on powder coating, the aluminum becomes entirely impervious to rust, warping, and rot, even in harsh coastal environments exposed to salt air and heavy moisture.
A: The standard depth for most modular outdoor kitchen pods ranges from 28 to 30 inches. This depth perfectly accommodates standard 24-inch outdoor refrigerators and provides enough internal cavity space for deep storage drawers and standard gas grill chassis requirements.
A: Yes, true modular aluminum systems are designed for future expansion. The precision-engineered chassis allows you to bolt new modules directly to the existing frame. You can easily add a sink unit, extra prep space, or more cabinetry as your needs and budget grow.
A: Requirements vary by municipality. While the pod itself may not require a permit if it is considered semi-permanent, running new hard-piped electrical, natural gas, or plumbing lines almost always requires a permit and inspection. Always check local fire codes regarding combustible setbacks.


